Tuesday, September 24, 2013

Spring Dress

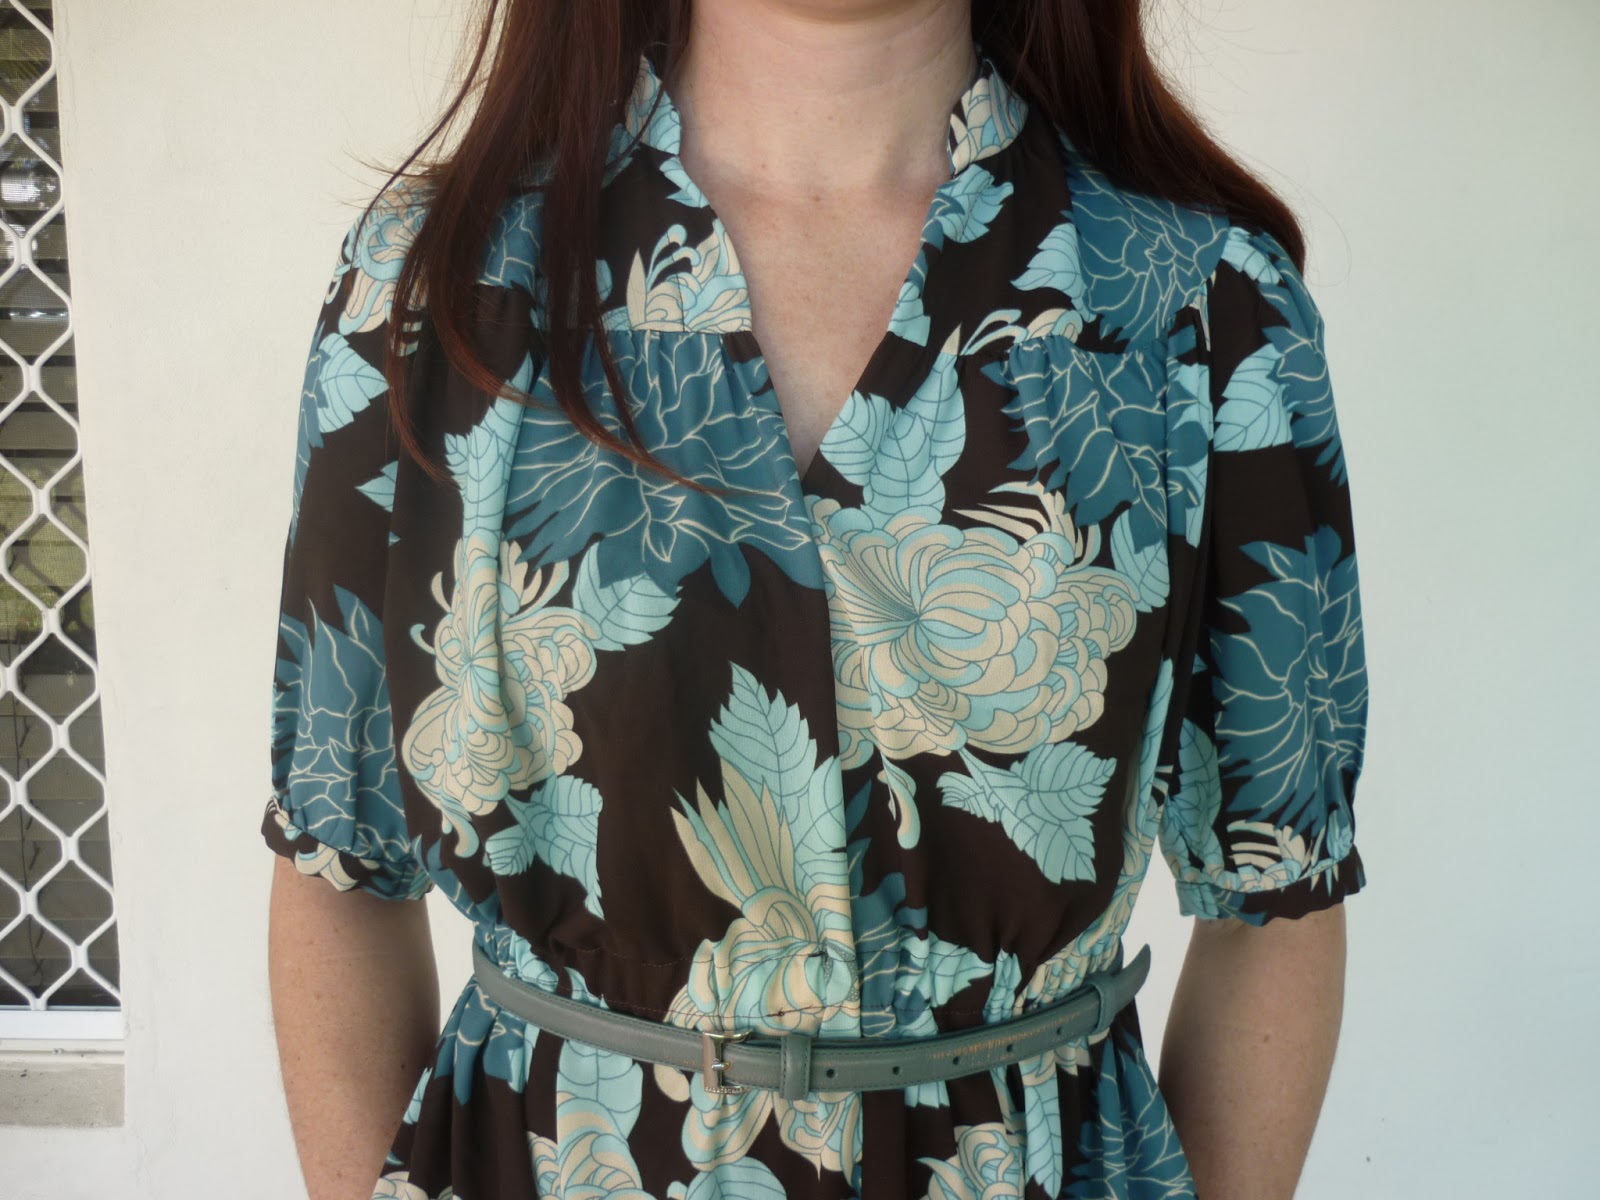
I said in my last post that I intended to make up for my lack of sewing in August, and I didn't lie! After not having made any nice dresses for months, I couldn't wait to make something really springy. I'm sure you all know the feeling of making pretty warm weather dresses after covering up all winter long!


I bought this gorgeous fabric exactly two years ago. It was $3/m and is really good quality quilter's cotton (it was reduced from $15/m). I love quilter's cotton and I don't give a crap what people say about it being no good for clothes. For  most dresses, I think it's perfect!


I used New Look 6910, the pattern I used for my Shitted Feet Dress, which I barley wear as I'm not happy with the fit. This time I made the scoop neck because my husband hates boat necks on me. I also cut the whole thing on the smallest size instead of grading up to the waist because this thing has a crazy amount of ease. I still had to increase the back centre seams to a whole inch to get it to fit, but all in all it came together really easily and quickly.


Whoops, the zipper pull is sticking up!


I lined the bodice with some white poplin I had in my stash. I was going to make the belt out of the floral fabric, but in a sudden stroke of genius I realised this green polka dotted stuff would look lovely as a belt. As an added bonus, when I tried on the completed dress, I discovered my $5 green heels were a PERFECT match! Win!


I love this dress so much. I finished it Friday night and wore it Saturday, Sunday and today (Tuesday).


Monday, September 16, 2013

Sewaholic Thurlow

Long time, no sew! I didn't complete a single project in August and I plan to make up for lost time. 

After my last project, my black coduroy pants,  I purchased the Sewaholic Thurlow pants pattern because I wanted to tackle something a bit more fitted, and I basically have NO pants that fit me since I put on 7kg in the past two years. I had about 6 pairs of lovely size 8 work pants that I had to sell on Ebay because my new big booty and thighs were far too big for them.

I really need a pair of basic black pants for band and orchestra gigs, and for a smart look at work during winter when it's too cold for dresses with tights. I decided to try the pattern out for the first time using this lovely pinstriped suiting that I bought last year from Spotlight. It looks black but it's really, really dark navy. So dark that I had to take it outside into the sun and hold a piece of black fabric next to it to discover that it was actually navy.

After perusing the back of the envelope, I decided to cut the smallest size (0), based on my waist measurement. I didn't make any alterations to the pattern, but I will have to next time to get a perfect fit. It took me about eleventy-five hours to trace my pattern pieces and then cut out all 47 pieces I needed to make the pants. I think I'd done 3 nights' work, about an hour each night, before I even sat down to sew.

The pants came together very easily. I was REALLY worried about the welt pockets, as I have heard horror stories about them, and I really am not that good at sewing so I thought I would completely balls them up. I took the bull by the horns and didn't even do a practice one, just made them straight onto my pants backs. Let me tell you, if you haven't done welt pockets before, you MUST follow Lauren's from Lladybird's instructions! It is absolutely impossible to eff them up if you do. In fact, if your pockets aren't perfect after following her little tute, then you have a turnip for a brain!


Here are my welt pockets. They look a lot better when there is no bum in the pants making them gape open. And for some reason, one of them is too close to the back crotch seam. Oh well! I think they are bloody brilliant for my first go.


By the time I was 90% finished and was able to try the pants on, I realised I needed at least an inch more in them. The best I could do was to reduce the side seams as much as I could. The fit is just on the small side of perfect.


My major eff-up (there's at least one in every project I make) was that I somehow made the waistband quite a bit wider on the right. And when I sewed my buttonholes, something went awry and the bottom buttonhole is too small for the button, so I just left it undone. If I can be bothered, I'll sew a smaller button on.

It took me just over 3 weeks to finish these pants, for various reasons. One, I had barely any time to sew. Two, the last month of winter was so hot (I'm talking bare legs and arms) that I completely lost all desire to sew pants. Three, I realised that I have basically nothing to wear with navy pinstriped pants.


Thankfully I finished them on Saturday and today I was blessed with a cold, rainy day so I grabbed the opportunity to wear them. I found this white blouse in the bottom of the ironing basket, where it lives for 364 days per year. It is really see-through and I didn't think that having my bra on display while teaching at a boys' school was a good idea, so I popped on this cute waistcoat which very nearly ended up being donated the other week. I'm glad I saved it because I think this makes a super cute ensemble! 


Look what I can do!

Saturday, July 27, 2013

Black cords and ponte tunic


I haven't posted anything in a while, but I have done a bit of sewing. First up is my first pair of semi-wearable pants. I'm not 100% happy with them, hence the semi. There's just something weird about them that I can't put my finger on.

I used the New Look 6873 pants pattern that I've already used twice. The first pair I made in a very loud fabric for a disco party, in size 10, which was far too big. The second pair was size 8 in a very ugly boring grey fabric with bad drape. My husband was cleaning out the garage and found 7 metres of black corduroy so I decided to give them another go. I was going to make this pair in size 8 but when I tried on the disco pair they fit me, despite being too big 18 months ago. So I cut a 10.


I knew from my previous attempts at this pattern that the legs are much wider than I like, so I very dodgily removed a whole 4 inches from the width of each leg at the bottom, tapering up to the top. There's probably a proper way to do this kind of thing, but I did my usual trick of doing it my own way. That's probably why the pants don't look quite right.

They came together very easily. I used bright paisley quilting cotton for the pocket inserts, fly, and waistband facing, as I knew that having multiple layers of corduroy in those areas would make the seams very bulky. I ended up having to take an inch off the waist seam as it was too big.

These are quite high waisted. I'm not sure if I like the high-waistedness or not. Also, I'm unsure which shoes to wear with them. I think flats would look better than heels. They are a bit too short for heels anyway.


I bought myself the Thurlow pants pattern by Sewaholic and am going to give that a shot next. I only have one other pair of pants that fit me, and they are so tight that it would be indecent to wear them to work.


A week ago I decided I needed a quick project. I had purchased some delicious red ponte specifically to make another Ottobre tunic.
There are only 3 pattern pieces so it's super quick to cut, and it takes no time to sew if you follow the instructions. However, I decided to finish all the seams and finish the neckline with a band rather than turning and topstitching, so it took a little longer.


I had never sewn with ponte before, and I love it! You can just sew it as if it's a woven fabric. No special needle or stitches needed! And the colour is to die for. It's not as bright as the first picture- the ones without the flash show the colour better.


The last time I made one of these I left out the pintucks on the neckline, but I'm glad I did them this time as they look so sweet (not sure how well they will show up in my crappy photos though). I love the little raglan sleeves.


Friday, July 5, 2013

Ridiculous 60s dress

Check out this silly dress I made. 


Aubergine corduroy, huge paisley pockets, a front zip and a removable Peter Pan collar...need I say more?


I used this 1969 pattern and removed 6 inches from the length. The dress is pretty hideous so I thought it make it really fun. I'm not sure if it really works, though. It rides up when I wear tights because I didn't line it, and that makes it bag up unattractively around my middle.


The collar was an afterthought as I'd made the dress to wear over a skivvy, but I thought in the warmer months I can wear it by itself with the collar on.


 What do you think???


Friday, June 21, 2013

Hideous 70s Dress


I got this 1979 pattern in a bulk lot that I purchased on Ebay. It's been languishing in my pattern drawer for a while, waiting for the right fabric. If you are confused when you look at the size on the pattern, that is no mistake- apparently I  have the same measurements as an 11-12 year old girl. The only good thing about this fact is that I can sew up old patterns like this without the need to make alterations for my lack of bust and hips.


I bought this fabric from Lifeline a few months ago. I got 3 metres for the princely sum of $3. It's very floaty and soft and I think it may also be from the 70s (it sure smells like it). I decided to make a wintery dress out of it because the background colour is an exact match to my 'new' genuine 1970s brown leather boots ($20 on Ebay, thank you very much!).


I wanted to make long sleeves but was short on fabric by about 10cm so I made do with the shorter sleeves. I had planned on making View 3 (with no elasticised  waist), but when I tried it on I looked like this:


 https://blogger.googleusercontent.com/img/b/R29vZ2xl/AVvXsEgKylZS3yZBUPXzyCGcbtrsQfGdKpvCHos2cCJkNHIT_Uc8l7DsTGdE3yEXUa7UXKpAMvQuMyc80iJfsYPcYTyY8KfqsQ2kMnblSU_IefygcXuuaAmfodpGreUXzQpF1iGM6A-w_gnrSP1v/s1600/muumuu3.jpg


There was just soooo much fabric! It was HIDEOUS! So I had to go and add the casing line for the elastic after I'd sewn up 90% of the dress, which was about as enjoyable as being stuck in an elevator with a modern railway enthusiast. 

Everything came together pretty easily, except for the collar, which was too big for the neck by a massive 2 inches. I had to adapt the collar pattern and re-cut it. Oh, and I couldn't put a button at the neck because it won't do up. No idea how that happened but I think it looks fine with the neck open.


I don't think I'll ever make this again because it took me about 6 or 7 hours, and let's face it, it's damn ugly and does nothing for my 11-year-old figure. But it looks super cool with my 70s boots and 70s jacket.


Sunday, June 9, 2013

Ottobre knit tunic


I started this tunic two years ago, not long after I first started sewing, thinking "How hard can knits really be?" 

Very bloody hard, it turns out. I have not touched a knit fabric since I started this project and threw it into my UFO box in disgust, having completed 90% of it.

Winter is here, and with it, my need to dress down on my days off with tunics, leggings and boots. I've looked around in the shops for some cheap tunics and there are none to be found- I guess they are out of fashion this season. So I dug out my UFO and decided to finish it once and for all.


The pattern is from Ottobre magazine. If you've never heard of it, it's from Finland and comes in Kids' and Women's issues. I subscribed for a year back in 2010, receiving 4 kids' issues and 2 women's. I haven't made too many projects from the mags- maybe 6 or 7- because I hate adding seam allowances. I'm such a lazy cow, aren't I?

This was actually the second one of these I'd made. The first one is here. I dutifully sewed the pin tucks on the front for the first one but couldn't be bothered with the second one. 

Sorry about the crappy photo.

 I bought this fabric about 3 years ago, before I became a super tight-arse fabric shopper. It was $24 per metre so I only bought one metre. I cannot imagine spending so much on fabric now- even though our family income has doubled in the past few years!

The instructions say to turn and topstitch the neck, but I thought it looked too flimsy (especially since this knit is so slinky) so when I picked it up to finish it, I decided to finish the neck with a band. It looks so much better.

All I had to do was finish the neckline and sew the hem, and I was done! Now I have a super cute tunic and I can't believe I let it wallow in my UFO box for so long.


Friday, June 7, 2013

Butterick B5032


This is the dress I made for my friend's wedding. I can't believe how easy it was! The only alterations I made were to remove 1 inch of width from the neckline and 1 inch of length from the bodice. I am definitely going to make this again.

The fabric is quilter's cotton (surprise surprise) and it was a measly $4 per metre.

I lined the bodice instead of facing it because I hate facings. I wish I'd lined the skirt because it sticks to my tights but I will find a little slip to wear under it.


Split at the back.


Little pleats at the waist. I love this detail!


 Off to the wedding I go!