Showing posts with label Sewing. Show all posts

Friday, July 1, 2016

Soccer Mom Dress: Lisette Traveller

Helloooo! Gosh, I really have been a slack blogger this year. I haven't really been doing a lot of sewing anyway. But now that the winter months are here (if you can call 24 degrees celcius 'winter' [ok, the days start off a lot colder than that, but end up in the 20s in the middle of the day]) and this is the time of year when I usually make something a bit different to what I normally would wear.

In winter, my work wardrobe doesn't really change- I'm a dress girl and just add tights and scarf (and leather jacket or vintage woollen coat if it's really cold). But on the weekends I live in either jeans and some kind of top, or leggings with a tunic-length top. I've noticed that tunic length chambray or denim shirts are quite popular, so thought I'd make myself one- even though it's the kind of item that screams 'soccer mom' to me, and I'm so not a soccer mom.


Spotlight had 30% off their denims about a month ago so I picked up two metres of this at $11/m 
(I bought extra so I could make a skirt or something for Lizzie). I already and a pattern in my stash- this one by Lisette for Simplicity, which is known as the Traveller Dress.

I've already made View A but need to remake it in some cuter fabric and with some alterations. I made View B, but with the collar instead of a silly little neckband thing pictured on that view. Since I already knew that the size 8 would fit, I just went straight ahead and cut out an 8.


This was a pretty straightforward sew. I took my time over the course of a week. I made the pockets using the wrong side of the denim to give some contrast. The denim is quite thin and was really nice to sew.


I did a couple of really stupid things. Firstly, I cut the front pieces right on the selvage, thinking that the button plackets would cover the silly little holes near the selvage. As you can see in the above picture, the holes are clearly visible. I also didn't follow the directions for hemming the dress/shirt/tunic/whatever (I overlocked it then turned it once, instead of turning it up twice) which made the button placket shorter than the hem. Not a huge disaster. 

Also, when I wear it, the bottom two buttons don't sit right. It's pulling across my hips so I probably should have decreased my seam allowance down there.


I *think* I like it...my husband says I look like a nurse from the 1970s, but what would he know? I think it needs some really bright leggings to make me feel not so much like a soccer mom. Stay tuned, they are coming!


Monday, April 25, 2016

Megan Dress by Tilly Walnes

Hello, dear readers...if I have any readers left after my huge blogging hiaitus! Gosh, I haven't blogged since February, and it's almost May. What a slacker! I have an excuse though...teacher, first term of the school year....say no more!

I've actually made a couple of things but haven't had time to take any decent photos of myself wearing them. I like to have at least of couple of photos of me wearing my creations because it's kinda boring looking at Jane (my dummy) wearing them. I'm much cuter than her.


Anyway! I've wanted to revisit a few of my favourite patterns, but I promised myself to sew new-to-me patterns this year. I doubt I'll be able to stick to that for the whole year but we will see how it goes. I've had my eye on the Megan dress from Tilly Walnes' book ever since I bought it, but put it off because I have this weird notion that patterns from sewing books are a bitch to fit. I blame the Colette Sewing Handbook for this. I made a toile of the bodice in about July last year, and finally bit the bullet a few weeks ago.


It's so cute. I love the little dart tucks at the bust and have never made a dress with them. Also, the high waist intrigued me, and who doesn't love a little puffed sleeve? In the back of my mind I was worried that the shape of this dress would not suit me at all...happily, I was wrong!


I cut this is a size 2 and made absolutely no alterations. Could the fit be better? Yes, probably. It could do with some back neck darts as it sticks out a bit at the back, but the rest is pretty darn good! 


I've worn this twice and have had loads of compliments. It is such a cute, flattering shape.


The fabric is some quilting cotton that I got from the clearance table at Spotlight for $4/m. This dress does not use much fabric at all and is great for using up smallish cuts of fabric in your stash.


The instructions were clear and concise, not that I really needed to follow them.

All in all, a most pleasing make!

Monday, February 15, 2016

Lizzie's birthday

My baby turned six on the weekend. Crazy!

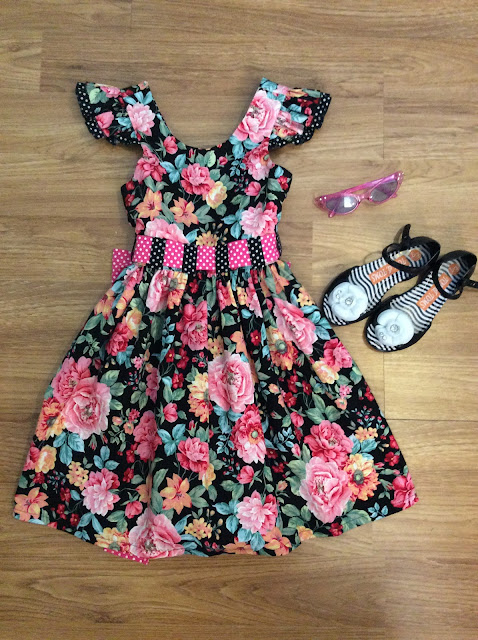
I always make her a special dress, and this year I decided on the Bow Peep Dress from the first issue of One Thimble magazine.


It's so pretty and girly!

For this dress, I wasn't my usual lazy self, and I actually went out and bought fabric specifically for this project. Some gorgeous black floral quilter's cotton, and some kind-of-matching polka dot quilter's cotton. The problem was that as I was cutting out the dress, I realised I was 30cm short. I didn't have enough to cut out the bodice front. I checked my local stores but they had sold out. I put out a call on Facebook and asked my non-local friends to look for it and post it to me. Then the following week, I went back to one of my local stores and they had it. Yay. But the next day, a friend in Brisbane sent me a text saying she'd bought me some from her local store. So I actually have a fair bit of it left now!

Anyway, this dress has some lovely features- the most obvious of which is the gorgeous thick belt loops which give a lace effect. It also has flutter sleeves (I doubled mine to make it even cuter), a massive sash, and button and loop closure at the back. How cute is it?!


I loved making this. The instructions were  good, but if I make it again I'll attach the skirt differently. It says to press in the seam allowance of the main bodice, and to sew the skirt to the bodice lining, top stitching the main bodice afterwards. It just looked too messy to me and I should have trusted my instinct which told me that my pressing wasn't straight enough for it to work that way.

All in all, a most enjoyable sew. Lizzie lives it. I don't have any action pics yet as they are still on my camera.


 I also made some cute bunting for her bed. It came all printed out on a panel- all I had to do was cut around the triangles, sew them together, and add binding. The panel also had a little owl shaped cuddly toy which I sewed up, but which is too boring to be photo-worthy.


Saturday, January 16, 2016

Scary sewing....swimsuits!

One of my sewing goals this year is to make Elizabeth and I some super cute bathing suits. I've never made one before, and am still slightly scared of sewing with lycra. So I decided to cut my teeth on the Boo! Designs one piece swimmers with some leftover bits of lycra.

The instructions for this pattern are amazing, and a really great starting point for those who have never made swimmers. I took the skills I learned from this pattern and used them on my second pair of swimmers.

I made up a size 5 without taking any measurements, and they are gaping at the top. I'm not sure if this is because they're too big or if I stretched the neckline whilst attaching the binding. I'm not too concerned because they were just a practice pair, and Lizzie loves them anyway. 


I bought this funky 1970s bikini pattern on eBay the other week and I started on it as soon as it arrived. 


I had some pretty good quality lycra that has been sitting in a drawer for ages as it really isn't my colour, and decided to practice with it. I cut the largest size for the bottom, according to my hip measurement, and a B cup for the top.


I used the skills I'd learned making the Boo! swimmers to attach the elastic and make the binding/ straps, and they turned out much nicer than I think they would've if I'd followed the instructions. It told me to use cord in the straps but I used elastic instead. I used my overlocker for all the elastic and the side and crotch seams, and used my regular machine with a zigzag stitch and stretch needle for all my top stitching. I used a twin needle when I made Lizzie's and was not happy with the result so I will stick to zigzag from now on.


The boobie cups have a dart, but when I sewed one up and tried it on, it looked ridiculous. So I drafted another cup without the dart and now they are a basic triangle shape, which works much better for someone like me who is not well endowed in the bust department.


My stitching is pretty dodgy but I wasn't trying to go slowly or be perfect. I just wanted to practice making swimwear and figure out what does and doesn't work. I didn't line any of it so its a bit nipply. Now I can order some better quality fabric and make something really cool.


The bikini bottoms are VERY brief. They only just cover my buttcrack. Crazy 70s fashion! I think they make my bottom look super cute though!


Sunday, November 29, 2015

Some Christmas sewing!

Last week saw my last day of work for the year. I don't go back until February! Yeeha! I seriously love my job as a flute teacher- it's fun, rewarding, and allows me to spend heaps of time with my children. My kids go to a public school so they still have two more weeks until their holidays, so I've been using my time to sew Christmas gifts.

My five-year-old Elizabeth absolutely adores Mummy-made stuff, so I always make a few things for her. Usually I make a dress for her to wear on Christmas Day. I decided to try a new (to me) pattern, the Honey Gum Dress by Ainslee Fox Boutique, which was in One Thimble magazine.


It is designed to be quite roomy in the bodice section, so there's lots of room for growth. The instructions are exellent and I sewed this up in a morning. It has the most gorgeous voluminous skirt!


I also made two little hair ties to go with it. The fabric is quilting cotton from Spotlight and I added a ribbon trim to the waistband to break up the bodice and skirt sections.


I also made her a cute little pair of shorts using this adorable print I found on EBay. I think it's Timeless Treasures. The pattern is Blue Jays by Bobkin, which are supposed to have the legs gathered into a little cuff, but I didn't have any nice contrasting fabric to make the cuff with and I think they look cute like this.


Lastly, a new hat. She doesn't have any nice hats that fit. I found a nice pattern in a book I have called Sewing Children's Clothing. This was so easy- I made it in about an hour! And I just realised that I hadn't taken photos of it, so took these just now as I'm sitting in bed!


It's fully reversible and I'm sure she will love it.

Next on my list is a blouse for my mother in law, a hat for my son, and a pair of Pacific Leggings by Sewaholic for myself and my sister. I haven't made them before and the fabric is expensive, so my pair will be the tester before I make my sister's pair. I'm hoping to get them done tomorrow.

What's on your To Make list for Christmas?

Sunday, September 13, 2015

Bonny bunnet for the Scotsman

I really have not been doing a lot of sewing lately, apart from making a few simple skirts for Lizzie and as birthday gifts for her friends. My husband ('The Scotsman') has been bugging me to make him this hat ever since I showed it to him. It is from Issue 6 of One Thimble e-zine.


At first I thought I wouldn't be able to make him one due to the enormity of his noggin, but I measured it and luckily discovered that the largest size would accomodate his Sputnik-sized head.

Every time he asked me when I was going to make it, I'd say "Soon...I'm just in the middle of making something else right now". Fathers Day was last weekend, and I thought I should finally pull my finger out and make him one.

I always intended to make it out of this beautiful wool tartan that I've had in my stash for about 6 years. After all, he is a born and bred Scotsman, and a Scotsman's bunnet should be made from tartan.

I had to go and buy some very stiff stabiliser from Spotlight, but everything else was from my stash. The stabiliser was for the brim of the cap. I wanted to get the curve of the cap perfect, so I marked out my stitching line using my trusty seam gauge and some chalk.


The brim turned out beautifully- taking these extra little steps really does make a difference to the finished product! Attaching the sides to the top was very tricky as I had to do a lot of easing to get them to match up and the use of many pins was necessary.


I don't have a tailor's ham, and they really are a necessity when making a hat, so I improvised with one of Lizzie's toys. It worked a treat!


Come Fathers Day, my hubby was completely taken by surprise when he opened his gift. He loves it and it fits him perfectly!


I'm mostly very pleased with my pattern matching. There is a tiny little pleat in the back side seam, which I tried 3 times to fix, but the top part just did not want to ease into the side.


Sorry for the dodgy background. I took these just as we were leaving for our Fathers Day picnic.


I think he looks so handsome in it! 


Friday, August 7, 2015

Cherry Bomb dress

I've been making so many things for my daughter this year...I decided it was high time for some selfish sewing! 

I've had this gorgeous cherry print sateen in my stash for so long...probably over four years. I wanted to save it for a time when I had the confidence to make something really nice with it. I thought about making my favourite pattern, the Simplicity Lisette Round Trip dress, but I thought the print would really lend itself to more of a wiggle dress shape. However, one-piece dresses are a beast to fit on my figure, so I decided to mash the Lisette bodice with the skirt from this groovy retro Butterick pattern. 


I cut the bodice on the second smallest size, tapering up a size at the waist, and cut the skirt on the second smallest size. The skirt has these incredibly complicated pleats at the waist, but they look nothing special from the outside! I ended up taking a mammoth 6 inches off the skirt length...seriously, a few inches below the knee is such an unflattering length (on me, anyway). My only other adjustment was to take a whole one inch seam on the centre back.


I did make one boo-boo, as is my way...I sewed my invisible zipper onto the wrong side (well, I sewed it to the right side of the fabric, which is the wrong side...) but I'm not too fussed about that as it's pretty neat. 


I didn't have any matching buttons (it only needs one, at the top of the keyhole opening at the neck) so I made a matching fabric covered button. Unfortunately, it fell apart today so I'll have to attempt to make another one or go and buy one black shank button.


I made my students take these photos today. They took about a thousand of them.


Anyway, I adore this dress, and think it's my new favourite. I'm going to make a few more of this bodice and skirt combo, and use up some more sateen from my stash.

Saturday, April 4, 2015

Bobkin Blue Jays shorts

Something very strange has happened to me lately...I've decided that I have enough dresses, and that I don't need to make myself something every month! Instead, I've decided my girl needs more mummy-mades in her life. Can it be that I've become a selfless sewer???


Elizabeth has lots of skirts and quite a few dresses, but not many shorts, and I think that shorts for girls are not only very practical, but also extremely cute. Most shorts in the shops at the moment are skanky looking and too short by far. I really like puffy little bubble shorts. Lizzie got a pair for Christmas when she was two years old and I loved them, but unfortunately they got too small for even her tiny stick legs last year and I had to donate them. I searched the Internet for a similar pattern and came across the Blue Jays pdf pattern by Bobkin. They go up to size 8 so are really good value. I also bought a dress pattern while I was browsing...will make that one in Spring :)

The pattern is very simple. There only three pattern pieces- one leg, one leg cuff, and one waistband. You cut the belt and belt loops using measurements provided.

I had two really cute fabrics in my stash. The brighter one is some drill that I never really had enough of to do much with after I made a pleated skirt with half of it. The other one is a sturdy but soft cotton. Both perfect for shorts! I paired the drill with some polka dot stuff, and didn't do a contrast with the other floral cotton. I intended to leave out the belt and belt cuffs on those ones. 


The instructions, I'm sorry to say, had me stumped. They start off really well, with the first step telling you to finish the edges that need finishing. I really appreciated that step, because sometimes I can't think ahead and finish my seams before it's too late and I've joined the seams together. Unfortunately after the first step, things got weird. The second step tells you to join the two shorts pieces together at the fronts and backs, with no further explanation. Now, I've made shorts before, but I got confused here and did completely the wrong thing and had to unpick it. I don't think that a beginner would have any clue what to do. Also, I had to ask for help online in one bit because the instructions kept talking about a waistband front and waistband back. I discovered that it actually meant waistband and waistband lining! 


The method of elastic insertion was extremely awkward and I really don't know why the designer chose that particular method. For the record, the instructions tell you to join the elastic ends and then keep it held down with your fingers and pins while you top stitch the waistband down. Soooo tricky. I tried sewing that way for about one inch, said f$@& this, then did it my way, which is to top stitch most of the waistband closed, insert the elastic with a safety pin, sew the ends together, then top stitch the gap closed. Much better.


Gripes aside, I really love the shorts, and will be making more pairs. I just will ignore the instructions next time!


I finished the cuffed ones first, then after I inserted the elastic on the second pair and had Lizzie try them for size (before I'd started the cuffs), she said, "I want the wegs wike this!". She liked the way that it kind of looked like a skirt without the leg cuffs. I was happy to leave them off, as it meant less work for me, and she was right- they did look pretty cute as skorts! I just turned the hem and added some ric rac...cute as!

Friday, March 6, 2015

Shagadelic Jiffy dress

As soon as my dear friend Trudie gave me this awesome fabric, I knew I had to make a cute shift dress out of it.


The last time I used this pattern, I had a really hard time getting it to fit me, but I thought I'd give it another shot as I think the style really suits the print of this groovy fabric. This time I graded the back waist to a size 12 (the top section is size 8) but weight want to do too much to the front as it has French darts and I was scared of stuffing it up. I wanted to add the cute little bow on the neck but I had barely enough fabric to cut the two dress pieces. The fabric was only 36 inches wide- I've never seen fabric so narrow! I'm it quite sure of the fabric composition- perhaps Trudie can help me out. I don't even know if it's vintage fabric or just retro repro.


It came together very easily, but when I'd finished and went to try it on, it wouldn't fit over my lower hips. WTF? I'm not even hippy...I have no shape! Luckily I'd only basted the side seams, so I just reduced them down as far as I could in the waist and hip area.


The fit isn't perfect- there is some excess fabric in my lower back and under my bust, and I couldn't even attempt pattern matching with the amount of fabric I had, but I love it! It's so cute and shagadelic!